skip to main |
skip to sidebar

After attempting my first dovetails around November last year, I havent built upon the experience or attempted any other dovetails since. The Small Pine Chest was (and still is) my favourite project so far and I think I got very lucky with some quite tidy joints for a beginner.
I decided it was time to attempt to repeat the experience, almost knowing ahead of time that the first time was a fluke, and so to prepare for disappointment.
The idea for this project came from a small piece of Oak I had which was an offcut from the first ever thing I made. I decided it would make a nice lid for a box, and this with a length of 6" wide Pine board formed my stock.
I wont bore you too much with the starting process, needless to say that the bench hook, tenon saw and square, chisel and knife saw to cutting the pine to length, before using my no#4 plane and shooting board to shoot the ends clean.
Having all my components to size, I started to get a feel for the finished box.
After cutting to length I noticed a slight cupping of the boards and so dealt with this by planing across and diagonal to the grain with both my no#6 and no#4 .

Time to get my tools sorted for dovetails....
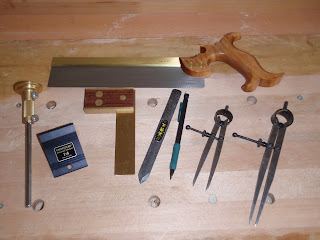
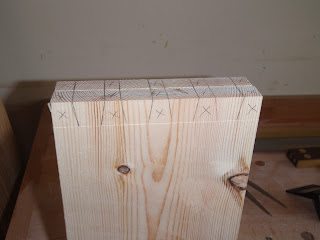
I used my new Veritas 1:6 dovetail template to make short work of marking out the tails, doing two boards at a time. Its certainly more accurate and less fiddly than using a bevel gauge. Time for some chopping...


After a quick sharpening session, I decided to remove all the tail waste using only chisels. Previously I think I removed the bulk of the waste using a fret saw. Once complete I marked out the bespoke Pins one board at a time using the side of my no#4 plane to mate up the boards accurately.

Maybe as a result of watching to many Utube dovetail videos, I tried to make the effort to not be overly slow and meticulous about making this box. I certainly didnt fuss to much with cutting the tails knowing the pins are marked from the tails and should correct any innacuracies. Obviously you get faster and better with time, but I dont want to spend a week making a simple box.
Ok .. first dry fit... not as good as they should be cosmetically but its certainly a strong box! Lesson learnt my board ends are slightly off square and hence my baselines are different either side of the board when marked out with the marking gauge. Its not a lot but enough to create gappy joinery. On with the show...
I thought it was about time I did my first ever grooved bottom and do the box bottom properly.
Ta daaa....The debut of my new Record 44 Plough plane. After sharpening the 3/16ths blade and a quick practice with a small scrap of pine, I went for it. The groove was cut to (just over) 5mm deep, meaning I had to allow 1cm in length and width when cutting the bottom piece. I decided to put the grooves all the choice through the pins and later hide the resultant holes with a skirt.
Time to cut some thin plywood for the bottom... 25cm x 17.5cm.
And do a dry fit....
The box holds together really tightly, it could probably serve its purpose without glue.... I hate this bit!
Panic over - I managed to get it all together with a lot of banging with a leather faced mallet and a scrap of wood. Unfortunately, the sight of the joinery closing up nicely with the added gap filler of glue led to me applying slight too much pressure....Doh!
Not to worry - its not the end of the world and I can probably doctor those small cracks when the glue is dry. The next step was to plane the old varnish from the box lid, trim it to size and add a decorative small bevel.
With the box out of the clamps I used my Stanley 102 block plane to trim the proud pins and tails before smoothing with my no#4.
The clamps and glue had helped to close up the dovetails, still not perfect and the odd one was a little gappy, but overall Im not too disappointed as a second attempt. In the true spirit of full disclosure, the following pictures show the pins and tails of all four sides.
Basically at this stage the box is almost complete and I had a change of mind (partly due to laziness) about fitting a skirt to hide the bottom groove in the bottom half pins. Instead I thought I would keep it simple, try and match the grain as best as I can and plug the holes.
I used a chisel to rive off small pieces of pine and trim to fit before glueing them in and finally using my flush cut saw to trim them off. I think they look fine.
So aside from having any hinges (which Ill fit at a later date) and a coat or two of Boiled Linseed Oil (BLO), I was done. All in all I am quite pleased with this project both in terms of how it turned out and the time it took me to do it. Being only my second attempt at dovetails and my first ever grooved bottom made it interesting from start to finish without it becoming too epic.
Read More..
I have been playing with my new Axe and carved a basic cooking spatula and kitchen spoon. Neither of which are finished yet, so this is more of a progress report really.
The wood is from a small Ornamental Cherry tree that I cut down from the garden a few weeks back and is soaking wet green. I dont really know much about Green Wood Working (yet), so I imagine I have to leave things to dry out before they can be finished? Any advice from readers would be appreciated!
The cooking spatula is functional from a Bushcraft perspective but thats about it!
I should have paid more attention to the small knots, the main one causing problems is on the side and there is another tiny one in the center of the blade - A lesson learnt. Once the wood has dried out I will try and sand a finish on it and oil it properly.
As for the spoon, well these pics are straight off the axe I havent touched it with a knife yet.

I have tried to keep the handle of the spoon the same design as the spatula as if by some miracle this little project was a success then they would make a nice matching pair. I dont have a Crook knife yet so I cant even begin on the bowl of the spoon.
One thing I am very wary of and that is not getting too attached to these little creations. The baton mallet I made last week has self destructed in the warmth of the central heating. Not so surprising I guess, Green Wood + Warm House = Cracked Wood. This is quite extreme cracking though!

Oh well - it still works (for now)...
Its certainly fun to just be able to sit down and hack into a piece of wood with an axe and make something vaguely recognisable. Its surprising how quickly you learn different techniques according to the accuracy of the cuts required. I am looking forward to getting some better wood as these pieces are just what I had in the garden. Id love to try a bowl out of birch or something similar.
If the spoon and spatula dont self destruct while drying out or before I acquire a crook knife, Ill get these finished and post the results despite how bad they look - Its all part of the adventure!
Read More..
 |
| The marketplace gathered around the Hand Tool Olympics booth. |
Well, my friends, another Woodworking in America has come and gone. This was certainly the most frantic and fun WIA I’ve yet attended (it’s my 2nd full WIA and 3rd overall). |
| Panorama of the party. |
The festivities began with the Blogger Community Party. It was an absolute blast. Thanks, Nik for setting it up. For me the party ended a very long day (12 hours of driving to get to Covington) with a very long night. A night that was to set the stage for the entire event. |
| Charles Brock talks chair joinery. |
Friday began with the sun glaring through the hotel window (I had forgotten to close the shades at 3:30 am). Somehow I dragged my butt to a 9:00 am class and I settled in for “The Maloof Leg-to-Seat Joint with Charles Brock”. The class was interesting, and Charles is a nice, considerate southern gentleman. Unfortunately, I’ve already seen this joint demonstrated by Andy Chidwick, and having listened to Shannon Rogers’ interview with Charles Brock during my drive to Cincinnati, I had already heard all the anecdotes.
 |
| "Find the hidden drawer." |
After Charles Brock, I headed to “Secrete Drawers and Hidden Compartment with Chuck Bender”. Though camera issues frustrated our instructor for the first two thirds of this class, Chuck soldiered on and told us about how it was so boring in the 18th and 19th centuries that secrete compartments were built into furniture in order to play the “find the hidden drawer” game. No matter why they were built in, they provide some very slick hiding methods and this was definitely and interesting class. |
| "This is how you cut it" says the Hand Tool Headmaster. |
By the time I had finished looking for hidden drawers, I was dragging my butt. So I skipped out on the next class and headed to the marketplace. There, the first thing I did was visit the Hand Tool School booth. And based on that visit I can now confirm for you, my dear reader, that Shannon Rogers is in fact, a real person. I touched him and everything. |
| Matt records Rob making a dovetail joint. No pressure. |
After chatting with Shannon and Chris & Garth of Time Warp Tools (with whom Shannon was sharing a booth) I ran into my Penultimate Basement Workbench teamate, Tom Iovino and was blown achoice by the speed and accuracy with which he had cut his dovetails. Egged on by Tom, I headed to the Hand Tool Olympics booth and cut some wood. |
| Vic gets a little "illegal coaching" in the Hand Tool Olympics. |
After dominating the boring and crosscutting Hand Tool Olympic events, I chatted up Richard Hummel of Woodpecker’s for a while (and bough a new story stick). If you’ve never talked with Richard, or used Woodpecker’s tools, you must. Richard is as passionate about milling aluminum as we are about wood and the tools he turns our are absolutely beautiful. |
| You MUST take a class with Adam Cherubini |
By this point I was dragging my butt, so I went back to the hotel to drop off the story stick and take a shower. When I got back to the convention hall, I ran into Shannon and followed him to “Nailed Furniture of the 18th Century: The Other Traditional Style with Adam Cherubini”.Following Shannon to Adam’s class was the revelation of the weekend for me. Though Adam’s traditional 18th Century methodology isn’t the choice I work wood (did I mention I own 9 routers?), he is a fantastic speaker and educator. The detail he goes into, the historical perspective he brings and tangents he goes off on are all amazing to watch and listen to. Even if I would make it with a table saw and Domino, the 18th century nailed furniture style piece he discussed was a beautiful cabinet. |
| Silly, Tom. Dancing is allowed on the seats, not the tables. |
 |
| How many woodworkers can you fit at a table? |
When the Friday classes were done, we went to Hofbrauhaus. There, they served delicious 1 liter mugs of fine beer. We had a nice time. |
Another great class with Adam Cherubini. Did I mention you must
take a class with him? |
Unbelievably, I received a work call on my cell phone at 8:20 on Saturday morning, and then there I was, on time for “Rabbets, Dadoes & Grooves by Hand with Adam Cherubini”. As with the previous day’s “Nailed Furniture”, “Rabbets, Dadoes & Grooves” was a witty and informative class, even if I would make the joints with a router. |
| With speed and accuracy like that, howd we lose? |
From Adam’s class, I went down to the marketplace and did my duty at the Hand Tool Olympics again. Thanks to equally impressive performances by my teammates, Matt Vanderlist and Tom Iovino, we failed to win. |
| His plane making makes up for any deficit in public speaking. |
Following lunch, Saturday afternoon was spent listening to “Tradition Improved: Lie-Nielsen Toolworks with Thomas Lie-Nielsen”. This was an interesting (if dry) account of how the Lie-Nielsen toolworks came to be and how they make some of the sweetest hand tools around. |
| Matt Gradwohl, hand model to the stars. |
I cut out of Thomas’ talk a little early with Matt Gradwohl, and we headed over to Adam Cherubini’s final talk of the conference: “Chisels Through Ancient Eyes”. This was a great primer on chisels though the ages and had many lessons relevant to chisel use and purchase today. It was also fun to see Adam use a piece of MDF and to discover that Matt is a world class hand model. |
| Nothing to add. Just a great bunch of guys. |
After Adam’s final talk there were no classes left needing to be taken, so I headed down to the marketplace again and met up with my blue shirted brethren. We managed to amuse a few spectators (and maybe even Charles Brock) when we shooed folks achoice and took our group photo in front of the fantastic Sinclair Tool Museum.
 |
| Yes, we can dominate a dining room. |
After the photo I bid the conference farewell and we headed over to Pompilio for what this New Yorker would say was a great Italian dinner. After dinner we managed to frighten the poor woman who was on the trolley when we got on, mostly by telling her how nice we were and how we weren’t frightening. |
| See you next year, my friends. |
Saturday night, and Woodworking in America 2011, ended at the Behle Street Cafe. It was great drinks, great woodworking and great friends. I hope to see you at Woodworking in America 2012.Oh, and did I mention that Rob Bois won a tenon saw? |
| Rob Bois: Tenon Saw Winning, Woodworking Underwear Model. |
Today I was asked a question on twitter. Kenny Comeaux asked me to recommend a trim router. Apparently, as I have as many routers as I do fingers (no, I’ve not cut any off), I’ve picked up a bit of a reputation as a router expect. Kenny’s timing was perfect, as tonight was the first time I used my new DeWalt DWP611PK trim router kit. I’m happy to share my opinion, and I figured here was the best place to do so. |
| The DWP611PK Trim Router Kit |
What’s so cool about the DWP611PK?The DWP611PK is a revolutionary trim router kit unlike any other trim router (sister company Porter-Cable has a DWP611PK clone). The revolutionary feature of the DeWalt is that it’s a standard fixed base / plunge base combo, only with a trim router motor. Also, and this would have been a deal killer for me had it gone the other choice, there are reasonably priced dust shrouds for both the fixed and plunge bases. |
| The fixed base dust shroud. |
Initial ImpressionsWhen I opened up the DWP611PK I was impressed. Though I’ve handled the fixed base model at Home Depot & Lowes, opening my kit was the first time I’d held the plunge base. I found that both bases are solid and well balanced. The plunge base is smooth and easily operated. The clear baseplates on both bases combine with the two (2) built in LEDs to provide excellent visibility. I find this very important, as a lack of visibility due to the solid baseplates on some of my other routers is a big complaint of mine. |
I didnt actually route the rabbet with the DWP611PK, I used the little
DeWalt to route out the original rounded edges (penciled in in the photo)
I left when I initially undercut the rabbet with my bigger OF1400. |
Adjustment MeansMy first, and arguably most versatile, router was a Porter-Cable 690 series. For as long as I’ve used it, I’ve never liked the adjustment mechanism of rotating the motor to bring it up or down. This requires unplugging it from the D-handle in order to rotate it, and when using the router against a reference surface, it has the potential of moving the bit relative to the reference surface if the motor and base are not perfectly round and centered.While the DWP611PK appears to have the same type of adjustment mechanism, DeWalt has vastly improved it. They have milled a vertical groove up the side of the threaded motor body and added a free-spinning threaded collar to the base. This results in a motor that does not spin, but only goes up and down. In use, you spin the threaded collar and the motor moves, guided by pins which ride in the vertical groove. I found this movement to be smooth and very easy to adjust. |
A close up of the adjustment collar on the fixed base. The yellow ring is
free spinning and can reference any potion of the black ring. Rotating
the black ring moves the motor smoothly up and down within the base. |
|
The plunge base is very well done, in a rather standard choice. The release lever is spring loaded and easily reached by the left hand without removing the hand from the grip. There are five (5) turrets on the rotating stop and the stop bar on the body adjusts easily and has a sliding indicator bar for measuring depth movement. It is a standard plunge but funtional and well done nonetheless.  |
| The 5 position (4 fixed, 1 adjustable) turret stop on the plunge base. |
In useOnce I had a ¼” upspiral bit chucked in the motor and the motor set in the plunge base, I went to connect my vacuum. I have a Festool CT22, a fairly ubiquitous dust extractor which I’ve had success connecting to most of my hand power tools (Festool or not). When I tried to connect the CT22’s hose to the DeWalt dust shroud, I was initially pleased that it fit the inner fitting of the shroud. Unfortunately, I soon realized that the outer fitting prevented the hose from making enough contact with the inner fitting to remain connected. I assume that the outer fitting is there to allow hoses of different diameters to be used. Unfortunately, it only prevented me from connecting with my preferred hose. After rooting around in the attic for a bit, I was able to come up with a Shop Vac hose end that fit the DeWalt dust shroud. Though this arrangement was slightly awkward, it stayed attached and worked fine. I’ll ultimately cut off the outer fittings to allow use of the Festool hose, but that’s a project for another day. |
| Little router, large vacuum hose connection. |
Once it was hooked up, I only used the DWP611PK in the plunge base and only for a few minutes, but I found it wonderful to use. It’s my first trim router, and it’s just what I wanted in a trim router. It’s lightweight, maneuverable, had great visibility and is quiet. In a matter of a minute I was able to enlarge the corners of the inner rabbets for my frame to address my initial under cutting.Am I glad I bought the DWP611PK?Yes. Though the dust shroud connection issue was a strike against the DeWalt, it was fairly easy to overcome and it’s not a deal killer. The DWP611PK is a versatile, well balanced trim router for a very reasonable price (especially from Amazon). When I consider it against many of the other routers I own, I know the DWP611PK will see lots of use in my shop. It will probably see lots of use in yours too.


