skip to main |
skip to sidebar

After attempting my first dovetails around November last year, I havent built upon the experience or attempted any other dovetails since. The Small Pine Chest was (and still is) my favourite project so far and I think I got very lucky with some quite tidy joints for a beginner.
I decided it was time to attempt to repeat the experience, almost knowing ahead of time that the first time was a fluke, and so to prepare for disappointment.
The idea for this project came from a small piece of Oak I had which was an offcut from the first ever thing I made. I decided it would make a nice lid for a box, and this with a length of 6" wide Pine board formed my stock.
I wont bore you too much with the starting process, needless to say that the bench hook, tenon saw and square, chisel and knife saw to cutting the pine to length, before using my no#4 plane and shooting board to shoot the ends clean.
Having all my components to size, I started to get a feel for the finished box.
After cutting to length I noticed a slight cupping of the boards and so dealt with this by planing across and diagonal to the grain with both my no#6 and no#4 .

Time to get my tools sorted for dovetails....
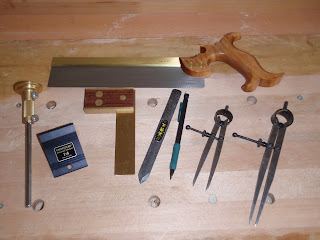
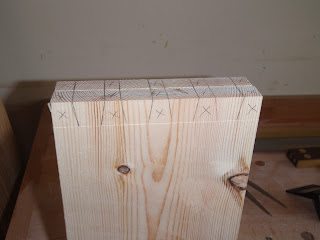
I used my new Veritas 1:6 dovetail template to make short work of marking out the tails, doing two boards at a time. Its certainly more accurate and less fiddly than using a bevel gauge. Time for some chopping...


After a quick sharpening session, I decided to remove all the tail waste using only chisels. Previously I think I removed the bulk of the waste using a fret saw. Once complete I marked out the bespoke Pins one board at a time using the side of my no#4 plane to mate up the boards accurately.

Maybe as a result of watching to many Utube dovetail videos, I tried to make the effort to not be overly slow and meticulous about making this box. I certainly didnt fuss to much with cutting the tails knowing the pins are marked from the tails and should correct any innacuracies. Obviously you get faster and better with time, but I dont want to spend a week making a simple box.
Ok .. first dry fit... not as good as they should be cosmetically but its certainly a strong box! Lesson learnt my board ends are slightly off square and hence my baselines are different either side of the board when marked out with the marking gauge. Its not a lot but enough to create gappy joinery. On with the show...
I thought it was about time I did my first ever grooved bottom and do the box bottom properly.
Ta daaa....The debut of my new Record 44 Plough plane. After sharpening the 3/16ths blade and a quick practice with a small scrap of pine, I went for it. The groove was cut to (just over) 5mm deep, meaning I had to allow 1cm in length and width when cutting the bottom piece. I decided to put the grooves all the choice through the pins and later hide the resultant holes with a skirt.
Time to cut some thin plywood for the bottom... 25cm x 17.5cm.
And do a dry fit....
The box holds together really tightly, it could probably serve its purpose without glue.... I hate this bit!
Panic over - I managed to get it all together with a lot of banging with a leather faced mallet and a scrap of wood. Unfortunately, the sight of the joinery closing up nicely with the added gap filler of glue led to me applying slight too much pressure....Doh!
Not to worry - its not the end of the world and I can probably doctor those small cracks when the glue is dry. The next step was to plane the old varnish from the box lid, trim it to size and add a decorative small bevel.
With the box out of the clamps I used my Stanley 102 block plane to trim the proud pins and tails before smoothing with my no#4.
The clamps and glue had helped to close up the dovetails, still not perfect and the odd one was a little gappy, but overall Im not too disappointed as a second attempt. In the true spirit of full disclosure, the following pictures show the pins and tails of all four sides.
Basically at this stage the box is almost complete and I had a change of mind (partly due to laziness) about fitting a skirt to hide the bottom groove in the bottom half pins. Instead I thought I would keep it simple, try and match the grain as best as I can and plug the holes.
I used a chisel to rive off small pieces of pine and trim to fit before glueing them in and finally using my flush cut saw to trim them off. I think they look fine.
So aside from having any hinges (which Ill fit at a later date) and a coat or two of Boiled Linseed Oil (BLO), I was done. All in all I am quite pleased with this project both in terms of how it turned out and the time it took me to do it. Being only my second attempt at dovetails and my first ever grooved bottom made it interesting from start to finish without it becoming too epic.
Read More..
I decided to make use of my newly acquired antique oak mainly to see what it will look like when planed and finished. I also decided some more dovetails wouldnt do me any harm.
So, in the same style as my last dovetailed box I got started.
I wont go into great detail as the build process has obviously been covered before. Usual drill - cut the four pieces to make the box sides and shoot them to exact length. Exact length being - two pairs, each pair being exactly the same size - I didnt bother to measure actual length. I also made the effort to avoid all knots and only used clear straight grained pieces of Pine.
The next stage, mark out the dovetails, Im still a tails first guy... and ... I got to try the new Poor Mans Moxon vice out properly.
My brain obviously hadnt woken up yet ... Look at my waste marks ... phew! Luckily, I realised what I had done, before grabbing the saw!
I got the tails cut and chiselled out without any further mishap. Wow! ..What a difference it was using my lovely new LN chisels, I can get them ultra sharp compared to my old Stanley Fat Max beaters.

Before I knew it, I had a box. Im not sure if I am getting faster or just had more fun chopping out the pins, but it didnt seem to take long at all.
Time for some grooves, for the plywood bottom...
Then it was time for my least favourite part of the process - Glue Up!
With some clamping pressure all the dovetails closed up nicely and I managed to mop up most of the squeeze out before it caused me a lot of clean up work.
I let the box cure over night before using my block plane and number four Stanley to plane down the Pins and Tails.
Time for a lid ... Using one of the newly aquired Oak pieces I first cut off the end that was cracked and marked with nail holes and then cut again to my required length.
I used my no#6 Fore Plane to remove the old finish and get the board flat as it was quite cupped. Once squared and trimmed to size, I used my no#4 to add a nice chamfer / bevel around the front and sides of the board to form the lid.
Lastly, I whittled and spit down some off cuts of Pine to fill the groove that showed through the bottom dovetail. Once, glued and cut off with my flush cut saw, the box was basically finished.
I added some small brass hinges and finished the box with a coating of Boiled Linseed Oil and some wax paste.
Lessons learnt from this project...


